Orders > Payments > Recurring Billing
Recurring Billing
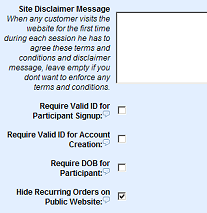
ePayTrak gives you the ability to establish Recurring Billing for your customers from the Admin side. Another feature of ePayTrak also gives your customers the ability to create Recurring Billing for themselves, a feature that can be toggled on or off. The setting is located under Configure > Store as shown below. Place a check in the 'Hide Recurring Orders on Public Website' if you don't want your customers to create a recurring billing schedule. (recommended)
By default, when your site is configured this option will be turned off. However, you can create recurring billing from the admin side in two different ways with our latest release. The instructions on this page refer to creating a billing schedule in advance during order creation for day care or similar recurring option. Now you can create a recurring schedule from within the order in the Order Manager, when unpaid order transactions are accepted. Instructions for our newest recurring feature be found here.
Create a Recurring Order
-
To place an order from the Admin side and setup Recurring billing in advance go to People > Users.
-
Click the Edit button next to the User's name. That will give you a screen with the User's profile.
There are several methods that will accomplish this task covered in more detail on the New Orders Page.
-
Scroll down until you see the Create Order section.
-
Click the 'Create Order' button to begin the order process.
-
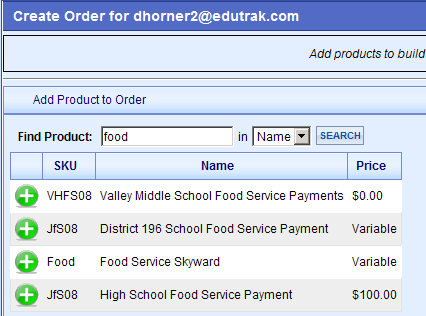
Then select the Product you wish to add, then click Search.
In this example, we used the variable price Product of District 196 School Food Service Payment as our Product.
-
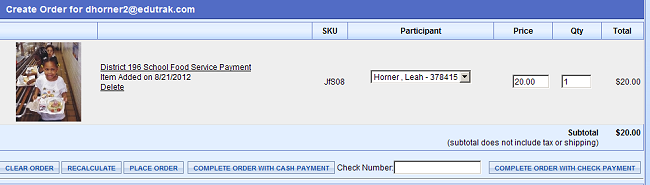
Click the Green Plus sign, fill in the amount (here we used $20) then click Save. That will bring you to a Create Order screen as shown below. (You can't use the Cash or Check buttons for payment to establish a recurring order.)
-
Then click 'Place Order' to get to the billing screen.
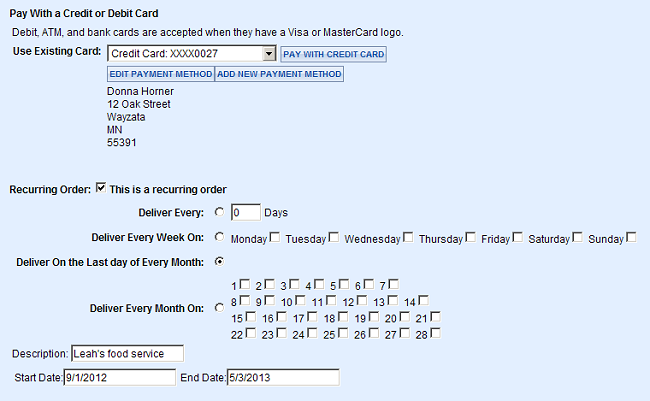
Select the Existing Credit card or enter a new credit card as necessary. Then click the Recurring Order box to establish Recurring Billing. Select the option you wish to use.
You have the choices of Deliver Every X amount of days that you select, Deliver Every Week On a specific day or choose Deliver Every Month On a particular day of the month or the new Deliver on the Last Day of Every Month option. Here I have chosen the last day of every month. So this order will process 9/30/2012, 10/31/2012, 11/30/2012, 12/31/2012, 1/31/2013, 2/28/2013, 3/31/2013 and 4/30/2013.
-
Add a Description, and then enter the Start and End dates in the format as shown. The Description field is required.
-
Then click the 'Pay with Credit Card' button. This will bring you to the Users page as this will not process a transaction until September 30th.
If you wish to allow your customers to create a recurring billing schedule, the steps below outline what the user will see. (not recommended)
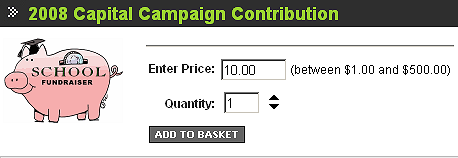
The customer selects a Product, enters the amount and clicks Add to Basket as shown below.
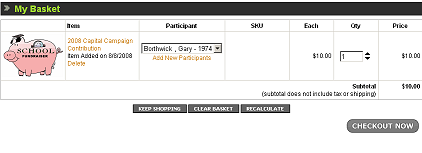
Then the My Basket window is shown. Customer will then click on the Checkout Now button.
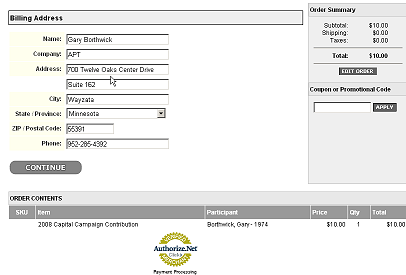
Customer will get the Billing Address Screen. Then click Continue.
The customer will then see the Payment Screen which is similar to the billing screen as shown above.
Related Topics:
-
Recurring Orders - Under Manage > Recurring Orders, you can edit schedules quickly from one page.
2017 © Edutrak Software, LLC